
On Wednesday, I described how I modified the YTU Revolved Abdominal Pose to help my rotational imbalances. Are you ready to try it? Here’s how, plus a video clip:
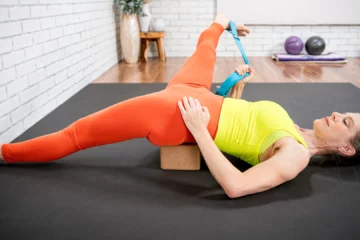
- THE EXERCISE: Lie on your back with your knees bent 90 degrees, so your shins form a “table top.” Place 2 yoga bricks, flat side facing up, on either side of you at hip height. If this is too difficult, place the bricks with the thin side facing up to bring the ground up higher and decrease the range of motion. Place the 3rd brick between your upper inner thighs. Keep your bottom ribs on the floor (the area below the bra/bro strap)—if you’re having trouble, bring your thighs closer to your chest. Point your arms up to the ceiling, palms facing each other.
- ROTATE in Neutral: On an inhale, let your knees and thighs land on the block on your right side. This is the easy part. Then, on an exhale, engage your TA, PF, Multifidus, Rectus, and Obliques to stabilize your spine. (In other words, don’t arch or round your back—just keep its natural curve and allow the muscles that stabilize your spine to do the work.) On an inhale, maintain that connection you’ve created, and on your next exhale, DE-ROTATE and return the legs back to table top.
- Repeat on the other side, and continue the exercise for only as long as you’re able to maintain a neutral pelvis and spine—that is, as long as you can keep going without hiking up your hips or otherwise “cheating.” This exercise asks your body to do something it never does: rotate against gravity, so it should be challenging.http://www.youtube.com/watch?v=zViUH3RckA8
Check out the Yoga Tune Up Pose of the Week
Learn more about Teacher Trainings
Read another post about yoga poses







Unfortunately, the video is currently unavailable, but thank you for the clear instructions in this modified version of the pose. I have never tried this with the blocks (and I still haven’t, yet) but it sounds like a good option for my students who “give in” too much to gravity on the way down. The blocks should help bring more awareness to the speed and range of their movement. It sounds like they will also help focus the student’s energy on resisting gravity on the way up.
Love this version of the revolved abdominal pose. When I first tried the other version of this pose I was having a hard time differentiating between lumbar spine movement and oblique movement. Slowing down and letting gravity take over was definitely a good lesson. After I felt like I got the sense of the pose, I tried the original version and got a lot more feeling/range of motion.
The video isn’t working, but I get the picture. I am going to make this variation my go-to…rather than just avoiding the pose. It is so helpful to know that there is always a modification to make the pose more accessible and make sure you are targeting the right tissues!
Unfortunatly I coudn´t watch the video, but your description is great, so I tried your deconstructed version puh I have to try it again and again.
What a fun variation! With hands to the ceiling there’s very little to help stabilize the core. It’s all you! I will be playing around with this one.
In my YTU journey I have become increasingly aware of my postural habits in daily life. It is quite a wake-up call how one side is dominant and stronger and has resulted in injuries showing up on my weaker side. I have found that performing an exercise in slow motion and with eyes closed enables us to tune in and become more aware of our movement habits. I like how you de-constructed the pose as a way to go on your archeological dig to find the imbalances and to stimulate the muscles that should be working.
Really appreciate the 3 block version with arms up. When I tried it without the arms as stabilizers I really felt the obliques kick in. The blocks helped me to me in a safe rotation for the spine and I was aware of some imbalances from side to side. Thanks.
Seems so subtle and innocent but is sooooo effective. One of my blind spots is exactly this one, I round my back a lot and tense my neck as if from there comes the strength to do every movement!
Love how you used the blocks to stop yourself from rotating all the way to the floor. Can’t wait to try. Let you know how it works for me over time.
How creative and effective. So much for the body and brain to do yet a small movement. Thanks!
De-rotation of lower spine with arms vertical, finger tips pointing to the ceiling helped me go deeper in my core. Awesome!
Thank you so much for breaking down this pose for us, Trina! I think we often overlook the huge strengthening potential we can get from the de-rotation phase of this pose – we often think it’s just about the lowering down of the legs phase. I can’t wait to refine this move in my own practice!
This move is such a great strengthener. I can see how tight my low back is by looking at my top knee in this pose: if my top knee struggles to keep in line with the lower knee as I reach the block…I know my back is tight needs some extra tlc!
This is great for building awareness of the muscles that stabilize the spine, not only for myself but my students as well. Thank you for mentioning the need to create congruency of the SI joint by stacking the ankles and knees in your comment below which made the movement make even more sense in my body.
This is such a strait forward way to become aware of the imbalance of strength in the R and L oblique muscles! I had to remember NO ARMS! The first time I tried it I though, “what’s the big deal?” Then OOOPS! Oh yeah… extend the arms into the air! My left was fine but my right was terrible. Thanks for the education.
I am fascinated by the concept of haviing ‘blindspots’ in our body. This de-rotation exercise is so simple, yet it brought such an awareness to a very weak spot on my right side of my body and back. I love the simplicity of this exercise and how easy it will be to incorporate it in my yoga practice.
i love how you’ve broken down the pose even further – and removed the upper body from the equation. Great way to uncover even more blind spots in rotation.
This video is great I am going to incorporate this into my practice. I think it will be really helpful for many of my roller derby teammates who experience chronic lower back pain because they are not properly engaging the core in cross overs. I will keep you posted on how it goes.
Hi Matt and Helen,
The purpose of the pose is to strengthen all of the muscles that sleeve your spine with muscular support during de-rotation. The pelvis should remain in neutral (no anterior or posterior tilt) with the knees and ankles stacked. The ziphoid process remains in line with the pubic symphysus (no spinal extension aka rib popping or spinal flexion is allowed) The knees and ankles are simply a visual icon for the PSIS’s which you can not see while you are doing the poise. Since you CAN see the knees and ankles, keeping them congruent and stacked ensures that the SI Joint is congruent and there is no shearing there. The SI Joint should be in a stable close packed position during the exercise because this eliminates “cheating” and forces the correct muscles to do the work: adductors, pelvic floor, TA, multifidus, diaphragm, obliques, rotatores, rectus abdominus,etc.
I hope this is helpful!
🙂 Trina
Just like so many other yoga teachers, many of my students (including me!) complain from time to time about low back pain. Reading your first blog reminded me of the importance of being keenly observant of the countless ways we move our bodies throughout each day. Habitual patterns are all over the place and often we don’t relate certain activities with how our body responds. It’s sort of a disconnect. Taking a simple supine twist and modifying it with blocks to activate the muscles of the lower back was brilliant. A question, though: how important do you feel it is when the student has twisted to the side that the knees and ankles are stacked before coming back to neutral?
I love the wording in this video, “de-rotation of the spine” and “tithing in the oblique muscles into the lower back” As a teacher I always looking to find fresh new ways to think bout how poses and exercise work.
Thank you!
Thank you! Quick question, neutral pelvis and spine…got it….assume I should cue ‘knees stay stacked as well to keep this alignment” as they rest on blocks. Just want to make sure students get that-as it is a challenge when there is minimal rotation for them…so higher end of block. Thank you so much Trina! I look forward to meeting you one day1 🙂
Part 1 was awesome and Part 2 brought it all together. I always love a video so I can see what the body is doing. I also love that I can share your expertise with my students. As I read the article, I realized how many “daily habits” I have. My goal this week is to become aware so I can make the change…personally and in my classes. As you said, I want to be “empowered to be aware of my alignment during my daily activities”. Simple, yet mind blowing information. Perhaps instead of always leading with the right, I’ll go left! Many thanks.