Good Posture: How the power of the pose can affect self confidence
As a new yoga teacher, I attended a five-day retreat with yoga teaching legend Judith Lasater. The expertise in the room was overwhelming. I spent the first several days in complete “I’m not worthy” mode, which I embodied in my posture.
I was making myself increasingly small – head down, eyes on the floor, shoulders hunched. Then Judith introduced us to the “Pavarotti Mudra”.
How to Embody Pavarotti’s Posture
For non-yogi’s, a mudra is a gesture or shape we take to embody an energy or intention. Pavarotti was one of the greatest opera singers of our time and an almost larger-than-life human.
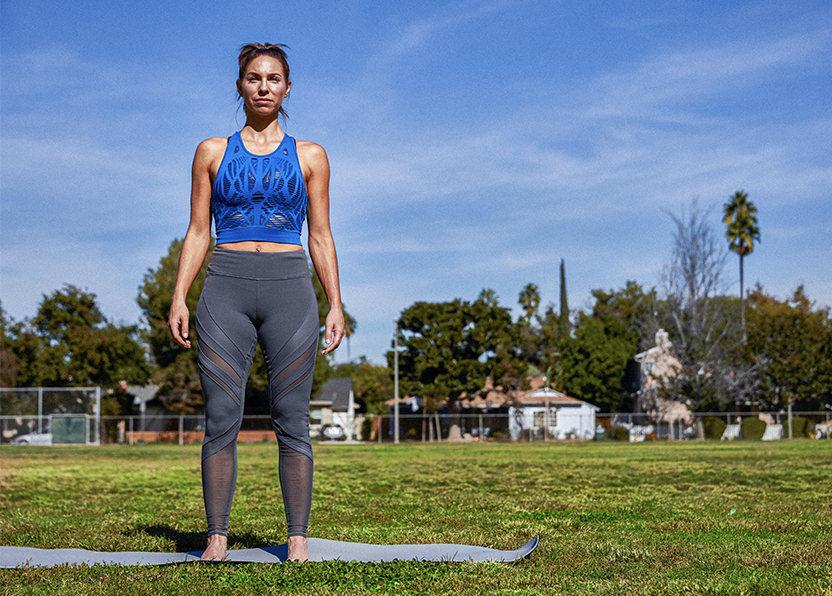
Judith described seeing him at Candlestick Park. He took the stage to thunderous applause and stood there – feet wide, arms spread in the air, chest broad, head back – soaking in the adoration.
Check out a photo here of “Pavarotti’s Posture!”
It’s entirely possible he was feeling unworthy as he took the stage. But he struck this pose and absorbed the love from the crowd.
Then she asked us to strike the same pose and say “I am worthy of your love” and “I belong here.” She invited us to intentionally take up as much space as we could, telling us we deserved to.
In so doing, I began to believe it. Such is the power of the pose.
Can a Posture Really Give You Confidence?
Several years ago, a TED talk spread like wildfire among those of us who teach movement. In it, social psychologist Amy Cuddy describes her research showing changes in blood chemistry brought about by conscious changes to posture. She called these “power poses.”
Sadly, a kerfuffle ensued when her results concerning changes to biochemistry were not replicable. Yet the behavioral results remain unquestioned.
Adopting an expansive (or powerful) posture increases feelings of power as well as boosting happiness, mood, and other related emotion variables.
Such a simple sounding solution to our insecurities – stand up straight and take up space when we walk in the room!
However, here’s where it gets difficult: through habit, most of us have adapted our muscles to be more comfortable in an “I’m not worthy” schlump than in a power pose.

How the “Upper Crossed” Position Might be Taking You Down
It becomes a lot of work to sustain a confident posture. Our modern lifestyles limit our movement to a small space in front of us – keyboard, steering wheel, phone, remote control.
We mold our bodies into a posture known as “Upper Crossed.” The pectoral muscles in our chest, the sternocleidomastoids of our neck, our upper trapezius and levator scapula adaptively shorten. Those shortened muscle fibers hold us in this shape we’re used to.
Meanwhile, our neck flexors and middle back muscles go “offline.” They’ve gotten so used to being held in a lengthened state that they are unable to support us standing upright.

Happily, power poses for confidence that I often teach as a Yoga Tune Up® instructor can make a big difference in reversing this slumped posture.
Do these simple exercises on a regular basis and notice how your posture (and feelings of power and confidence) improves.
Practices to Strengthen and Uplift
Step one: Loosen up the chest and upper back/neck muscles with Roll Model® Method Therapy balls.
Exercise #1: Roll out tight pecs and chest muscles
The beauty of this technique is you can use any of our therapy balls. Each will offer you a slightly different experience. If I’m feeling extra tender, I reach for the Coregeous® ball. But today I’m choosing the Therapy Ball PLUS self massage ball because it covers a good amount of territory while still giving some of the surgical precision we want for our pin, spin and mobilize technique.
Finding the right spot for the therapy ball:
Place your left hand on the right side of your upper chest with your middle finger touching the top of your shoulder and your thumb reaching to the notch of your sternum (sort of like “I pledge allegiance, but over to the side). Your hand is now covering much of your pectoralis major.
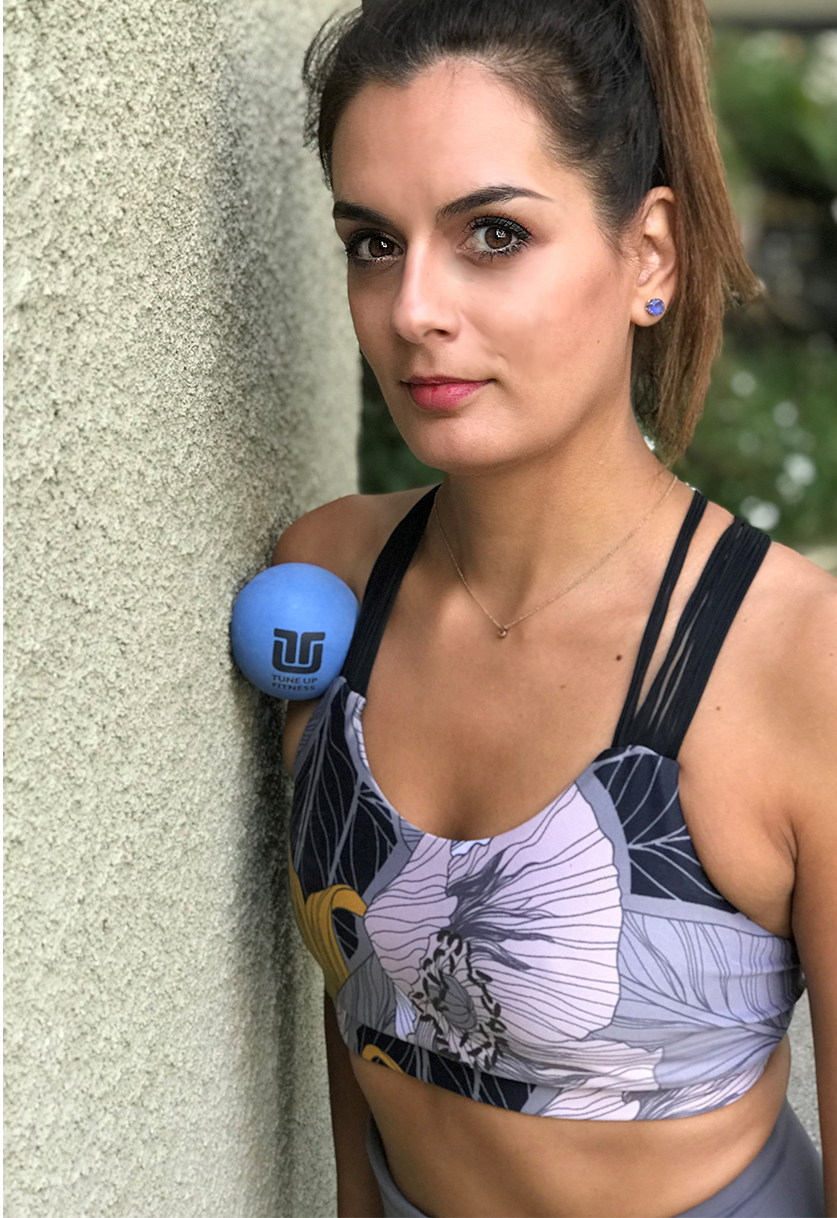
Start with the ball anywhere in this area and lean into a wall. Then, proceed with the following steps.
- Spend a few moments just breathing and receiving the sensation.
- Then slowly start to move side to side, letting the ball roam from the sternum over to the arm. You can even go arm to arm, allowing the ball to traverse the bony sternum.
- After several passes, pause with the therapy ball in a meaty portion of the muscle on your right chest (this is the pin). Your body may have already highlighted a sticky place for you.
- Stay leaning into the ball as you bring your left hand up to twist the ball into the skin, gathering up the layers of skin, fascia and muscle in a little vortex (the spin).
- Holding on to the twist, take your right palm to the wall by your side and slide the hand up the wall as high as you can (the mobilize). As if you are waving “ahoy” to a friend across the water.
- After several waves, twist the ball in the opposite direction and wave again.
Now bring the ball up so it snuggles into the bottom edge of your clavicle (the collarbone). Roll it along the clavicle until it is nestled inside the head of your humerus (top of your arm bone). This is about where your pectoralis minor attaches – a muscle that actively pulls your shoulders forward into the schlump.
- Either shrug your shoulder up and down or bend and straighten your knees to move the ball vertically along these tissues.
- Then take your right hand down by your side, reach it back, and bend your elbow to bring the back of your hand somewhere on your back.
- Take several deep breaths as you lean into the ball.
- Next, move your arm in and out of this “half nelson” position while leaning into the ball.
Repeat all of these moves on the other side. Then take a moment to stand quietly with your arms at your side and take a full breath. Notice if you feel more open and expansive in your chest with your shoulders naturally settled down and back.
Exercise #2: Massage Upper Traps and Levator Scapula
Stay with the same ball, or switch to the Original Yoga Tune Up® size, and turn your back to the wall.

- Hold the ball in your left hand and reach it across your body to place it about where a bra strap goes, or the strap of a shoulder bag, – you’ll know the place. It’s where a friend might say “wow, you look tense” and rub your shoulders.
- Lean into the ball and once again pause and breathe to allow the sensation.
- Proceed to roll the ball across the upper shoulder area between the base of the neck and the bony outcropping of the shoulder.
- Feel free to play a little, swimming the arm around. You’ll find lots of sweet little gnarly bits crying for their turn with the ball.
Back to business. Bring the ball about midway between the base of the neck and the widest part of your right shoulder. Far enough down that you can lean solidly into it.
- Shrug your shoulder up and down and feel for the medial border of the scapula connecting with the ball. This is our next ball placement: the insertion of the levator scapula.
- Pin the ball against the upper inner point of your shoulder blade, leaning as much weight into it as you are comfortable with.
- Let your right arm be heavy as you drop your left ear towards your left shoulder.
- Hold for a breath, then maintaining the sideways tilt of your head, move your chin toward your left shoulder. Slowly travel between these two movements several times. Then return your head upright.
Remove the ball, pause and observe how your right shoulder feels compared to your left. Then repeat on your left.
Exercise #3: Strengthen upper back and posterior neck muscles
Once that your pectoral and upper back muscles have eased up some tension, strengthen your upper back and neck to support a more upright posture.
With the front of your chest and your shoulder-shrugging muscles massaged and relaxed, it is time to strengthen some of the muscles whose work is to maintain your confident posture.
Salabasana (Locust) with a strap or resistance band is an excellent and accessible choice.

- Lie face down on your yoga mat or floor.
- Hold your strap or resistance band about shoulder distance apart behind your back, wrapping your hands around it as necessary. Palms facing up.
- Bring your forehead to the mat and your legs together. Press your pubic bone into the floor as you squeeze your glutes, reaching your tailbone toward your heels.
- Gently pull the hands apart, tautening the strap. Feel the back of your shoulders and upper back starting to work.
- Pull the front of the shoulders away from the ground so your arms are parallel to the ground.
- Using your back, lift your chest and forehead away from the mat at the same pace keeping your chin a bit tucked and the crown of your head reaching forward. You are making a straight line from the crown to the hands. If you feel some work deep in your throat that’s fantastic! You are activating your deep neck flexors which will help you hold your head high.
- This may be enough work. You can hold for a few breaths, release and repeat 3 to 5 times.
- Or you can continue to lift your hands higher, lift your legs and turn your gaze forward. See if you can maintain the pose and breathe several conscious, deep breaths.
For a playful extra challenge, try the face down Pavarotti Mudra–lift up into Salabhasana but now reach your arms forward and wide and allow your legs to widen.
Observe Any Changes to Posture and Confidence
Whichever option you’ve chosen, finish your practice by standing in Pavarotti Mudra.

Then stand at ease and take a little walk. Do you feel more open and approachable? Is it easier to hold your head level and let your arms swing by your sides? Do you feel a bit more powerful? Try this sequence 2 or 3 times a week and let us know in the comments if people respond to you differently.
Next time you find yourself in a situation where you are feeling small, you’ll have the tools to project yourself with confidence. You may discover that it is warranted and you are worth it.
Shop this post: For upper back and chest massage, get Original Yoga Tune UP Therapy Ball Pair or Therapy Ball PLUS Pair in Tote. If you need a strap for the Locust exercise, try out our Double Loop Stretch Strap.
Related Article: Springtime in Your Joints: 5 Ways to Preserve Joint Health with Jill Miller
Learn more about our Therapy Ball Products and Programs
Interested in video and blog content targeted to your interests

Such a powerful connection between posture and mindset. I loved the reminder that how we carry ourselves can shift how we feel inside. The Pavarotti Mudra is going into my daily routine, I love the “embody worthiness and take up space” sankalpa. I plan to do more to open the chest and shoulders in my strength classes.
This sequence helps to bring awareness to the muscles we need to engage in our power poses. Standing expansively can go a long way in projecting our confidence – even when we might feel that we could use a little more. Loved this post!
I love the sequence that Alison created, and the inclusion of Pavarotti Mudra, I’m definitely going to use that! I gravitated to yoga and martial arts exactly because of the way they make me feel; more grounded, more present, more confident and joyful. Cultivating an intention of confidence is important. Its a two way street, our thoughts affects the body and the body affects our thoughts.
Thank you for writing and sharing your experience Alison. I suspect we’ve all felt the the ‘imposter,’ ‘out of our element’ sensation rip through our psyche. I appreciated how this author connected the dots between the posture when they felt out of their element to that of the ‘desk jockey’, providing movements to counter these.
The Pavarotti stance, is a memorable stance I will take with me. Thank you
A beautiful summary of the journey to mindful posture. I love the combination of massage and movement. Addressing such an important and contemporary topic in a way that doesn’t intimidate but instead offers concrete and simple tools is incredibly valuable! Thank you.
Thank you for the great tools and tips. I often find myself in a slouchy posture when I feel stressed or anxious and I have tried a few times to put my body in a Superman pose which really helped with the emotional aspect. I definitely have to invest more time in improving my overall posture and now I feel very well equipped for that.
Thank you for writing this article that hits on both structural and emotional aspects of posture. The three exercises are really helpful. My occupation demands a lot of sitting and load of meetings; my day can easily run from 8 am to 8 pm. Add driving and computer work, and my scapulae are permanently protracted. After a long day of meetings, I actually feel ‘folded up.’ I’m going to try standing up and doing the Pavarotti posture while I’m at the office (behind closed door likely).
Sometimes when I’m feeling anxious before a class, I do a silly thing where I go into the bathroom and do something very similar to this Pavarotti pose. Even just visualizing my posture changing can make me feel more settled. And I loved this ball sequence and am looking forward to seeing how things shift after doing it for a few days. When I did the upper back/neck area, I looked in the mirror after the first side and you could SEE the change.
This article is spot on. From addressing the realities of our lifestyles to our confidence issues. I know for me for years, I protracted my shoulders to an excess in passive moments because I was subconsciously trying to protect myself and shrink smaller. Even standing up properly really does have so many ripple benefits from confidence to breathing easier. I also appreciate the examples and ideas to release these space with fascia tools AND strengthening. Both are so important!
In season 2 of Ted Lasso, we see Richmond owner Rebecca show her power pose to both Keeley and Nathan. We see this same pose again in one of the last episodes during season 3. While I don’t know that there is any true chemical changes throughout the body, power poses is something that many leaders, speakers, actors, and persons in some form of limelight have all agreed upon being a necessary piece of their success. The pin the arms on the yogi pose is such a great pose for learning how to retake control of our upper bodies which have become conditioned in the upper crossed position of our modern environment. The rollouts here and actively using the pin the arms on the yogi pose will go along way to taking back ones power while improving the upper body posture.
Oh my gosh! I love that you brought Ted Lasso into your comments❤️❤️❤️
I have seen the TED talk and know in my experience that standing upright and taking up space physically transfers to my willingness to take up space in a social way in a room. Thank you for sharing these exercises. I will try them.
I watched that TED talk and referenced it for a project in massage school! I was so blown away when I learned about the power of posture and started to notice how my mood and energy changed with different poses and positions I found myself in throughout the day. Whether the findings in the blood chemistry are replicable or not, or if it is simply a placebo effect, I truly believe that good posture has a noticeable good effect on the mind and body.
Posture really does increase confidence, such subtle changes can make a world of difference. By practicing asana’s or movements that go through different planes of body while engaging muscles we can help ourselves, or our clients find their homeostasis while becoming observant of their ‘blind spots’ which can lead to better posture overall with condition, and time.
Merci pour ce superbe article, je vais essayer cette pratique et la mudra pavarotti, c’est génial !!!
C’est tellement vrai! “Se mettre dans la situation” ou “adopter une posture de super-héros” peut effectivement changer notre propre perception et celle des autres!
I am especially drawn to these articles on posture – great ideas. I know it took me a while to consider the pec major (and other muscles in the front of the body) when thinking about how to roll to improve posture.
Oui, je suis en accord avec l’idée que la posture influence comment on se sent devant les autres. Elle témoigne de notre assurance et de notre confiance lorsque notre regard porte au loin et que nos épaules ne tombent pas. Les exercices proposés sont super! Pour ma part, j’aime bien entrer dans un jeu de rôle…me mettre dans la peau d’une personne qui a réussit et agir de la façon qu’elle agirait dans une situation X.
Très intéressant, il est clair que la posture influence non seulement la confiance que l’on a en soi mais certainement le regard que les autres posent sur soi. Il est important de comprendre que le corps, sa place dans l’espace peu certainement influencer l’esprit. Bref quand nos émotions nous disent, “you are not worthy”, il serait important de prendre conscience de notre posture, de combattre ce reflexe en prenant une plus grande place dans l’espace avec notre corps, cela nous permettra probablement de changer notre minding et de devenir plus confiant.
I love reading anything that talks about the mind and body connection, and this article is definitely one of them. For most of us confidence doesn’t come naturally and for years I and many of my peers have had to adopt the “fake it until you make it” especially in the world of performance but also in the world of fitness. I love how this article touches upon helping others find and embody that self-love/ confidence within.
Love the illustration on upper cross syndrome, putting the “big X” helps to see connection between facilitated and inhibited muscle groups.
I found the pec and chest rollout helps me breathe better too.
Benn working on my posture for years now….My proudest moment was a few years back after being diligent about my posture….someone asked me if I could not stand so straight! Lol Success! These are great tips~!
C’est une bonne idée de se répéter de prendre le plus de place possible et sentir que notre corps prend cet place pour tranquillement finir par y croire.
I think the massage with the ball is the most powerful way to release the tension we all have because our bad posture.
One of the barriers I encountered as a youth was self-consciousness…I didn’t want to stand tall and I didn’t want attention being drawn to my (lack of) boobs- so curling into as much of a ball as possible was the best way for me to hide, though I did this unconsciously at the time.
I was not receptive to being told to adjust my posture because of some far out chronic condition I could be causing…I was much more receptive when someone I respected pointed out I was hiding behind my own body.
Addressing the emotional barriers may help bring importance and relevance to the youth who are being sucked into unfavourable positions by phones and aggravating these slouched poses as their emotions are manipulated by social media and cyberbullying (huge contributors to body dysmorphia and self-consciousness in youth). I think when addressing posture, in particular with those who may be conveying emotions through body language, it’s important to validate the emotion while shifting the posture with the amazing tools and resources provided in this article.
It’s one thing to teach the body how to sit, but if the brain believes it’s safest curled into a ball, that is where we will default without a second thought if we do not introduce emotional awareness into the adjustments.
The preparation for the locust with the massage of the pectoralis is a very nice sequence. I also like the Pavarotti mudra idea very much. It makes me smile 😀
Wow, j’aime ça , je m’approprie ce mudra”. Changements chimiques dans le sang provoqué par des changements conscient de la posture.”Intention consciente.
I love this, During a week long dance training, I’m sure many others were feeling tired like me and a bit like I’m just not getting this am I good enough to continue the training. The teacher stopped the entire class looked at us and told us to give her a wonder woman stance and to lift our chins high, hold it and believe it before moving on. It was wonderful the whole classes energy picked up and I could tell that such a simple thing like posture really made a difference.
Pavarotti Pose rocks! I’m a big believer that changing our body language can change our mindset and that includes going from self-deprecation to self adoration. Perfectionism often contributes to “I’m not worthy” belief patterns. As Jill says, it’s process, not perfection. This roll out of the chest and upper back really helps me break through the stubborn layers of shielding that I hold, especially in the chest!
This post resonates w me so strongly ! I’ve spent So many years of my life in school and in training after training , with years of teaching under my belt. But it’s been a few years since I’ve practices bc of life and illness getting in the way. And as I’m in this YTU TT I find myself feeling a bit like an imposter and making myself small. It happens so many of us so easily. I’m really going to take this post to heart
The slump pose is so easy to sink into for me…my shoulders live in internal rotation as a result and the weakness increases. Thank you for a great sequence and inspiration to step into confidence
What an interesting concept! Love these exercises
Loved this! So very true, and I enjoyed the supporting articles, Ted talk and photos. Will be doing the exercises more often for my own release.
A wonderful reminder how care and attention to our posture can have a Doppler effect to our emotional and physical well-being. Great post and guide to taking the “upper crossed” position out of our daily lives.
I haven’t heard this term “Pavoratti’s Posture” before…love it, and the reminder to take up space and make it a priority! I am worthy!
What a great way to show a physical routine to boost metal fatigue. It’s all connected. Love it.
Love this blog post. Great detailed info how to strengthen muscles for posture maintenance ❤️
I love all the tips to help open up the chest and shoulder girdle so you feel more at home in a confident state!
This is an amazing piece for all to read! The power pose is hugely important and really can set the stage for how you enter a room and make a first impression. These are great takeaways and rolling methods for those who might find themselves at a desk for a long period of time and could use a good roll to avoid the upper crossed syndrome.
It amazing how the way we walk and the way we stand says a lot about how we feel at that moment, and how just by changing our posture we can directly affect the way we feel. Its something very simple but that can make a big difference. Thanks for sharing !!!
Our body reflects our inner and outer state, so we can choose to use it wisely for our health and confidence. Giving this self-care into those tight areas in the upper body not only helps to becomw more aware of them but also allows for a deeper, fullee breath. As I did the massage my face gently relaxed and I could feel more ease of mind. Being aware of our posture is an everyday job.
I love the name “Pavarotti’s mudra” … definitely the posture says too much about who we are or how we feel. By just standing upright we can breath better and it changes completely our mood and our health… thank you for the exercises with the balls, they really help.
Totally agree! Posture can definitely affect our mood, our thoughts and how we see life. If we are constantly seeing and walking through life in a collapsed way then i think life will respond to us like that. I´m taking that Pavarotti reference to my students! Thanks for sharing.
I definitely agree that posture can affect the way we feel, affect confidence, and generally speaking work to manifest whatever emotion me might attach into that posture. Amy Cuddy’s TED talk is one of my favorites. I really enjoyed the YTU ball sequences paired with the strength exercise. As posture is important and can indicate the attitude we may use in engaging in various activities, it’s also essential to develop more insight into the body on how to relax and/or strengthen areas that may be tight and/or weak in order to open ourselves up into easing into these power poses we may not be used to. Additionally, recognizing why we may doing the a more self-defeating pose and how that affects our muscles/body in addition to mood is great self-inquiry in itself.
Posture does affect how we feel, not only posture but facial expression, and they all have to do with our mindset, Sankalpa.
I couldn’t agree more on posture boosts confidence. When I was in my 30’s & 40’s I studied dance and learning the postures and how to stand tall helped me in so many ways , that I believed in myself and went on to open my own dance studio. Now that I am older I want to continue learning how to support the body , free from pain and ; or injury despite the natural aging process and so I became interested in YT U
I have been trying to improve my posture for years now, ever since a colleague commented on my horrible, scrunched up posture as I was slumped over my computer completely stressed out, trying to meet a deadline. I saw myself in the window and couldn’t believe it. Then I went to a class and was introduced to the YTU therapy balls. The release and difference I felt in my posture was immediate. Now I have the vision of Pavarotti to further remind myself to stand tall and proud. Thanks!
I have been working on my posture for many years. Initially the bad posture was probably related to the confidence level, then it became a habit. I will definitely be benefit from those exercise routines. I also love the “Pavarotti’s Posture” idea. He is my all time favorite singer, I will use that thought as an inspiration. Thank you Allison!
What a great post! The connection between mudra, posture, and rolling techniques is so powerful. “I belong here” is a sankalpa I use frequently and now I’ll include a check in with my posture to see if I can physically and mentally embrace and embody that sankalpa.
I have been performing some of this exercises on a semi-regular basis in the last year and I have felt a great improvement in my posture. Having my posture being better I feel so much more confident, I used to not like having pictures taken of me because my head was hanging too forward but after some rolling and strengthening of my upper body muscles, my head is resting closer to where I’d like it to be and it makes me feel so much better.
Thank you Allison! I have experienced this in my professional career. When I am fighting ‘Imposter Syndrome’ I will try to incorporate these ideas in order to feel confident and capable.
Great ideas Alison – I just took your training this past weekend – didn’t realize you wrote this until the end! I’ll be doing these in my next class!