If there were ever a body blind spot, it certainly would be the pelvic floor.
In sports, movement classes, private coaching, Physical Therapy, etc., the pelvic floor has historically been left alone. Many of the professionals working with these clients don’t even mention it.
After I suffered a significant spine injury over a decade ago, not one person in a whole host of talented and educated professionals ever mentioned my pelvic floor, let alone addressed it as part of my recovery. My injury was in the cervical spine (neck), so why would they have brought it up?
The missing piece at the time was that I had pelvic floor dysfunction, causing instability. I was also an intense thrill-seeker and pushed my body hard. Add in a few other factors, and I had a recipe for a spine injury–which lead to two years of living with chronic nerve pain.
Discovering Pelvic Floor Dysfunction Therapies
I was missing this piece in my recovery until I had a baby. After giving birth, I wanted to be sure my body was operating the way it should to prevent issues down the road. So I went to a Physical Therapist who specializes in pelvic care.
This is when the effects of restoring health to the pelvis blew my mind.

I discovered I had a chronically tight pelvic floor. But as you might already know, tight doesn’t mean strong.
Being able to turn muscles on and off is integral to the health of the body. My pelvic floor muscles didn’t know how to naturally take a break. Because of this, they were constantly in a state of panic—clenching and fatigued, which blocked their ability to get stronger in order to properly support me.
This led to my professional specialization in breath, massage, and strengthening practices to restore pelvic floor health.
I’m writing this article to empower you to ask questions and seek professionals who will look at how your entire body is functioning, not just the one or two problem areas you walk in with.
I’m also sharing these practices so health and fitness professionals will consider expanding their knowledge base with how the whole body is connected–including the pelvic floor.
Addressing Pelvic Floor Dysfunction with Therapy Balls
For years now, I’ve been guiding students on how to enhance the health of their pelvic floors. I lead transformative techniques with Roll Model® therapy balls, breath, and movement.
After a workshop that included this work, one gentleman in his 30’s, a firefighter, couldn’t believe how tight his pelvic floor was and how impactful the release was.
Most people I work with have a similar reaction. Releasing the pelvic floor, as I will teach below is empowering because you get to take the health of your body into your own hands.
This work paired with strengthening the pelvic floor will be very helpful if you laugh, sneeze or cough and sometimes go to the bathroom. If you jump up and down or lift heavy weights and then urinate, this work can help you overcome that dysfunction.
The pelvic floor is also an area heavily impacted by hours of sitting and sub-optimal posture. When the body is not aligned—whether it’s sitting, standing, or moving—the pelvic floor must hang on for dear life trying to stabilize the structures of the pelvis and the organs above it.
Important note:
An important piece to keep in mind is that this is an especially vulnerable area for many people. But if you have ever been violated—male, female, or non-binary—this adds even more to the mix. Releasing with the therapy ball and breathing downward might feel extremely empowering, but it also might bring up some big emotions.
I encourage you to take the time to explore your own experience. Also, have trustworthy people available for support, should you want help processing whatever might surface. Go slowly and give yourself space, you deserve it.
How to Use Therapy Balls to Release and Restore Your Pelvic Floor
The first plus of using the therapy balls to release the pelvic floor is that they simply help you have access to it.
If you have been pregnant you might have been told to manually “massage” the area with oil to prevent tearing during the birth of your baby. If you have tried this, you can appreciate that it is not very comfortable (or accessible) positioning.
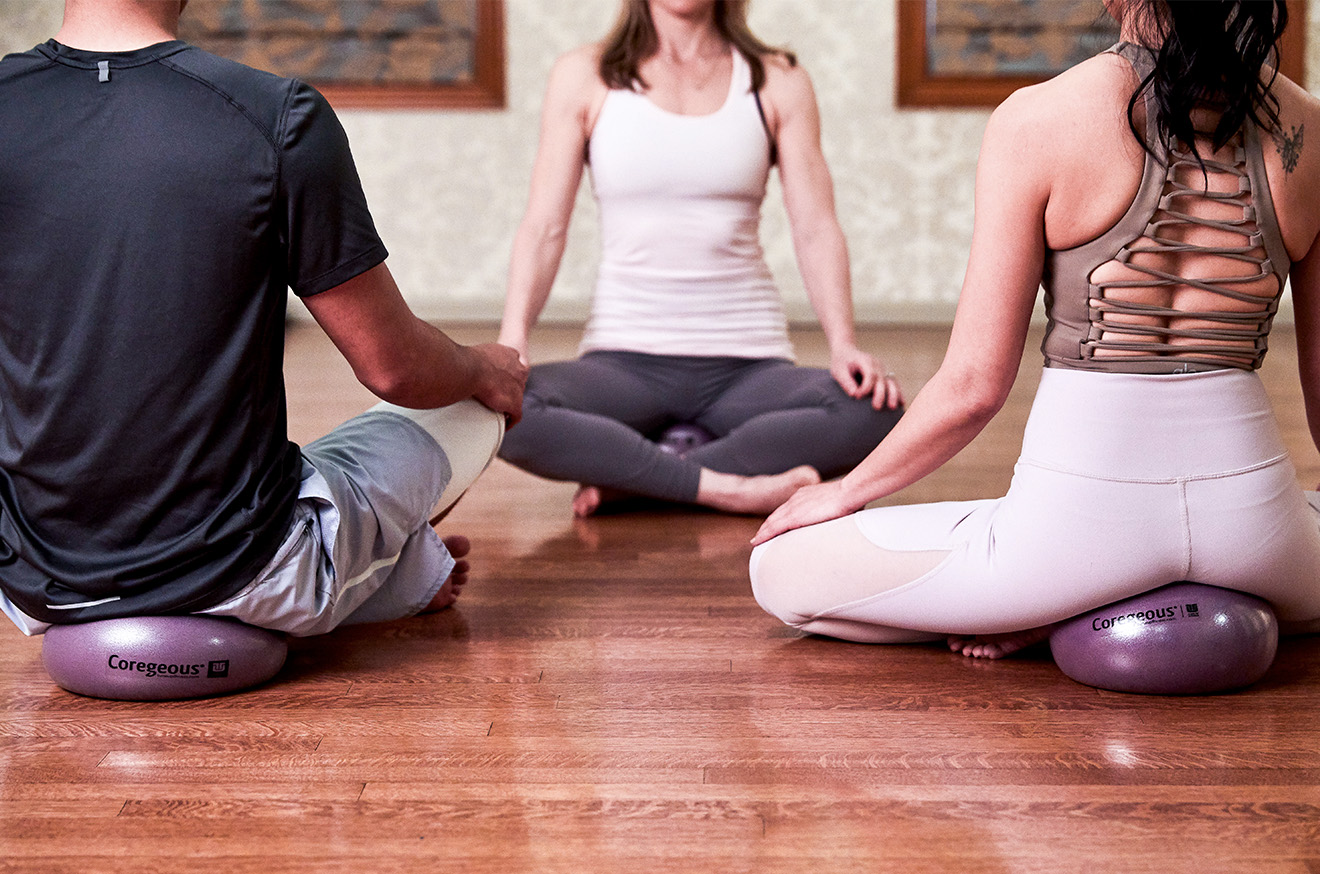
The ball setup pictured below enables every person, regardless of their flexibility, to ease into releasing the pelvic floor.
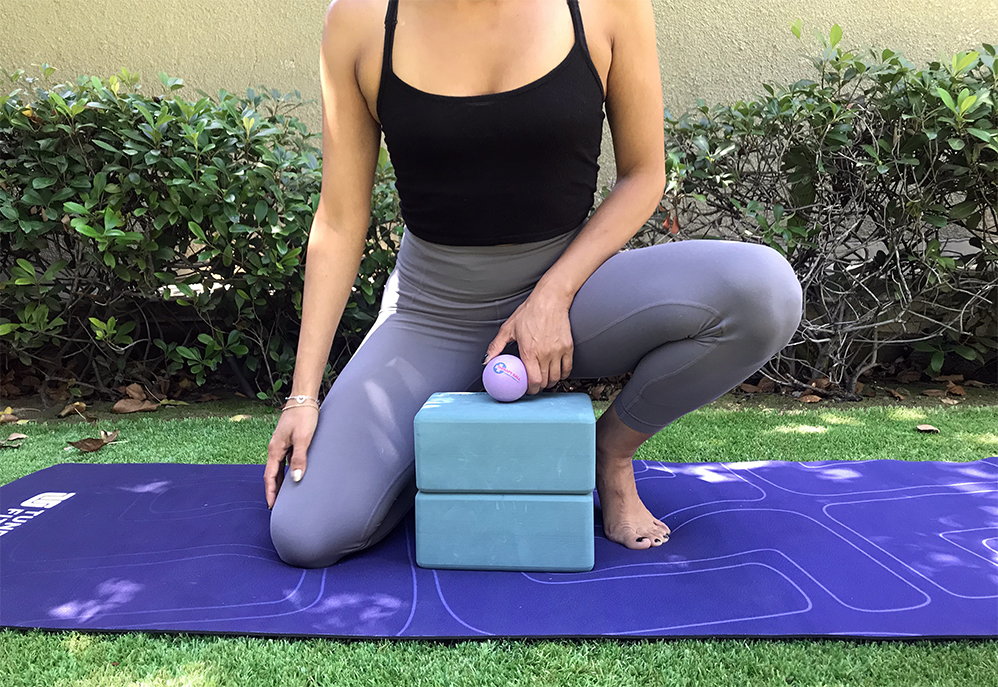
This work can be done while sitting in a chair or on the floor using props under you–the ball position is the same. To do the work on the floor, use yoga blocks (books work, too) and stack them to fit your dimensions.
Use an older Yoga Tune Up® therapy ball, or if you only have a brand new one, break it in with your feet prior to doing this work. You can also wrap the ball in a towel or blanket to soften the intensity.
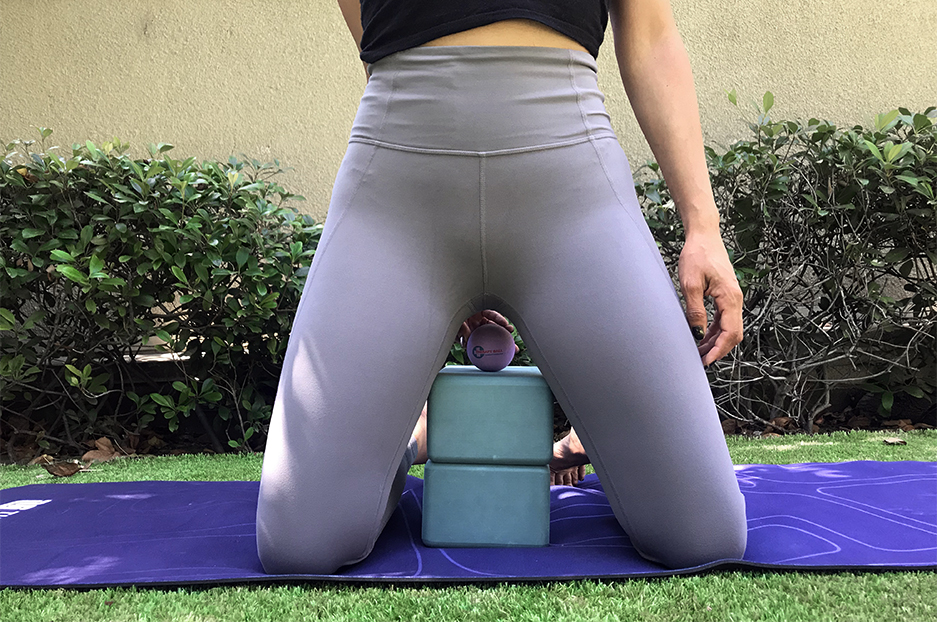
Place the ball on the props and slowly descend your body down toward the ball. You want the ball to nestle into the center of the transverse perineal muscles.
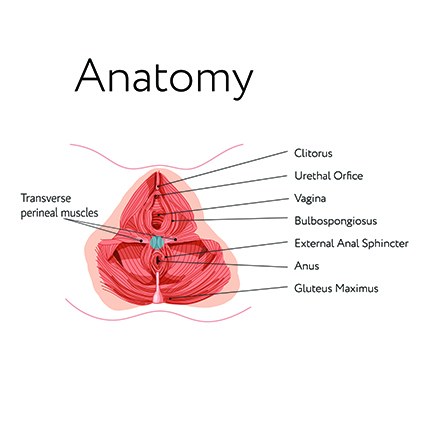
On female anatomy, this is behind (posterior to) the vaginal hole and in front of (anterior to) the anus. On male anatomy, the spot is behind (posterior to) the scrotum and in front of (anterior to) the anus. See the diagram of a female pelvic floor below for reference. Place the therapy ball where the gray circle is.
Follow these steps to get the therapy ball in place.
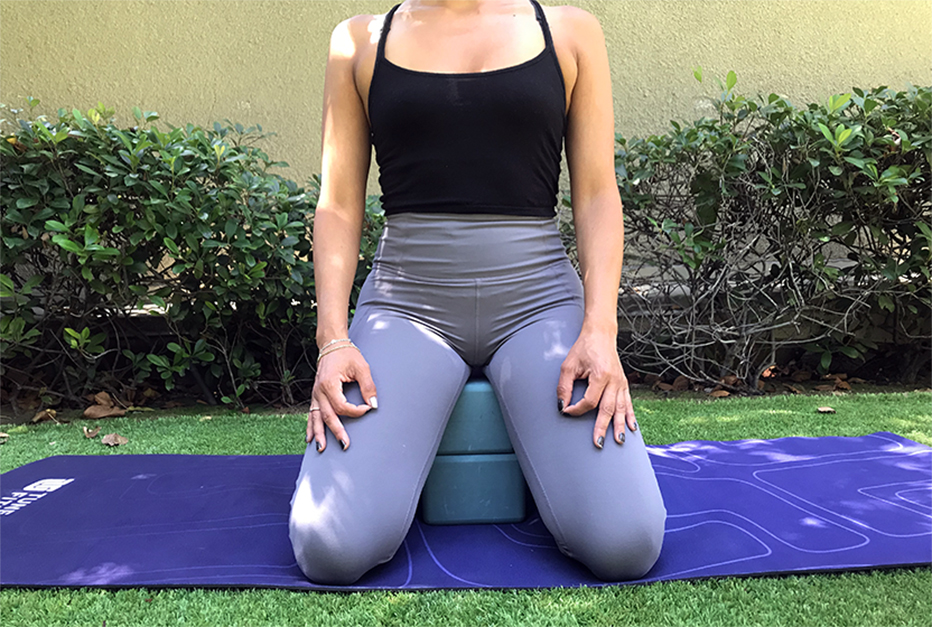
You are not alone if you get confused placing the ball! I promise. (Many of us have not been encouraged or given permission to anatomically understand this area of the body.)
Once you have settled your weight onto the therapy ball, make sure you are able to breathe easily and aren’t holding your breath. You might be shocked by how much sensation you feel. Take slow, easy exhales and let your inhales naturally respond once you empty yourself of air. If the ball provides too much sensation, use the soft Coregeous® ball instead, pictured at the top of this post.
Next, shift your weight around on the ball with tiny movements. Move a little more to the front of the ball, and then the back. Be mindful of the tailbone—you never want to put any pressure on this area.
Finding different edges around the perineum, allow the ball to snuggle into different angles and nooks. Spend 30 seconds or a minute starting out. Then remove the ball.
Position your spine in neutral (which means there is a natural curve in your low back, shoulders are neither rounded forward or pulled back, head over your lungs.)
Breath Practice to Sense and Engage the Pelvic Floor
Now try to breathe down into where the ball was previously. Allow the breath to drop lower without forcing it. Seek a balloon-like sensation in the pelvic floor with the tissue softening on inhale. On exhales, sense your soft tissue/perineum/pelvic floor area come back up into the body.
Try this for a few rounds.
If you aren’t getting any feedback, on your next exhale actively LIFT the pelvic floor. Please do not clench or tighten. Picture an elevator rising up.
When you begin this work, sometimes it is easier to activate a few exhales before you will even feel the tissues release on inhale.
If you aren’t feeling anything, that is absolutely okay. I have had hundreds of students over the years unable to do this at first. Consider adding the above release and breathing strategy to your movement diet a few times a week. Consistency and patience is key.
As you continue to practice you will create new brain channels of movement for the body to wake up the musculature. The goal is to retrain this area and teach it both to release and engage, not just engage.
Practicing this style of breathing is strengthening your body. It is the piece I was missing; I never learned the pelvic floor should release on inhale until I attended a yoga therapy conference four years ago. In many yoga circles, we are taught to release or let go on the exhale, so for me, activating my pelvic floor on the exhale was foreign and took time and practice to embody.
Strengthening Exercises for Pelvic Floor Dysfunction
The next step after the self pelvic floor massage and breathing is to add movement.
Set yourself up in bridge pose prep: lay on your back with feet and knees approximately hip-distance apart. Maintain a neutral spine (low back is naturally arched away from the floor).
For the first few breaths, rest on the ground in this position.
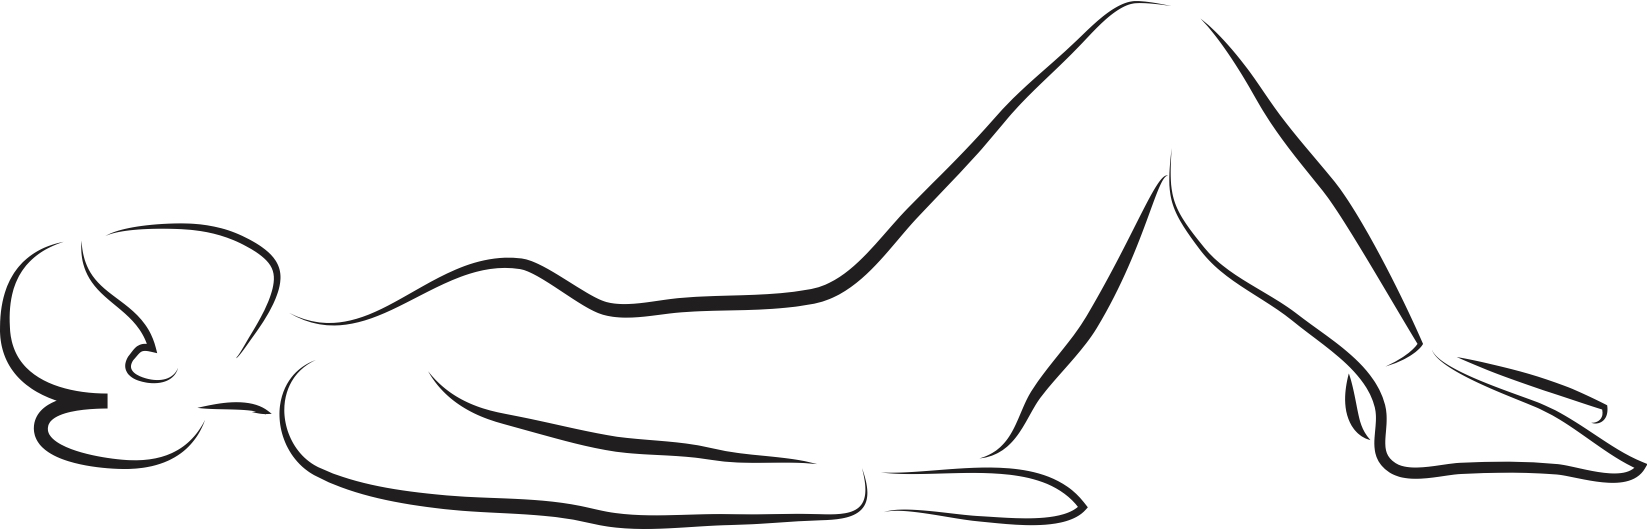
As you inhale, encourage the pelvic floor to soften.
As you exhale, first lift through the pelvic floor, then engage your lower abdominals just above your pubic bone as you continue to exhale—visualize your front hip bones coming together.
Your body has not lifted; you are on the ground still laying in bridge pose prep.
If you aren’t feeling the hipbone piece, that’s okay. After I had my daughter this was a Bermuda Triangle of feeling (or lack thereof).
Please keep sending the message to your body and working through this. It might take some time to get it so be patient with your body and yourself.
Continue trying to inhale down to soften, then exhale to lift up through the pelvic floor and bring the frontal hip bones together. (They won’t drastically move together, but we are asking the lower abdominals to engage and this is the sensation you want to be feeling.)
Bridge Pose to Strengthen and Tone the Pelvic Floor
For the next piece: inhale to soften all effort and soft tissue, then on an exhale lift through the pelvic floor, mentally engage the muscles to bring your hip bones closer together, THEN you can pick up your pelvis, low back, middle back, and upper back off the ground to come into bridge posture.
This bridge is not about “rolling” your spine up or down. Keep a neutral spine as you lift the hips.
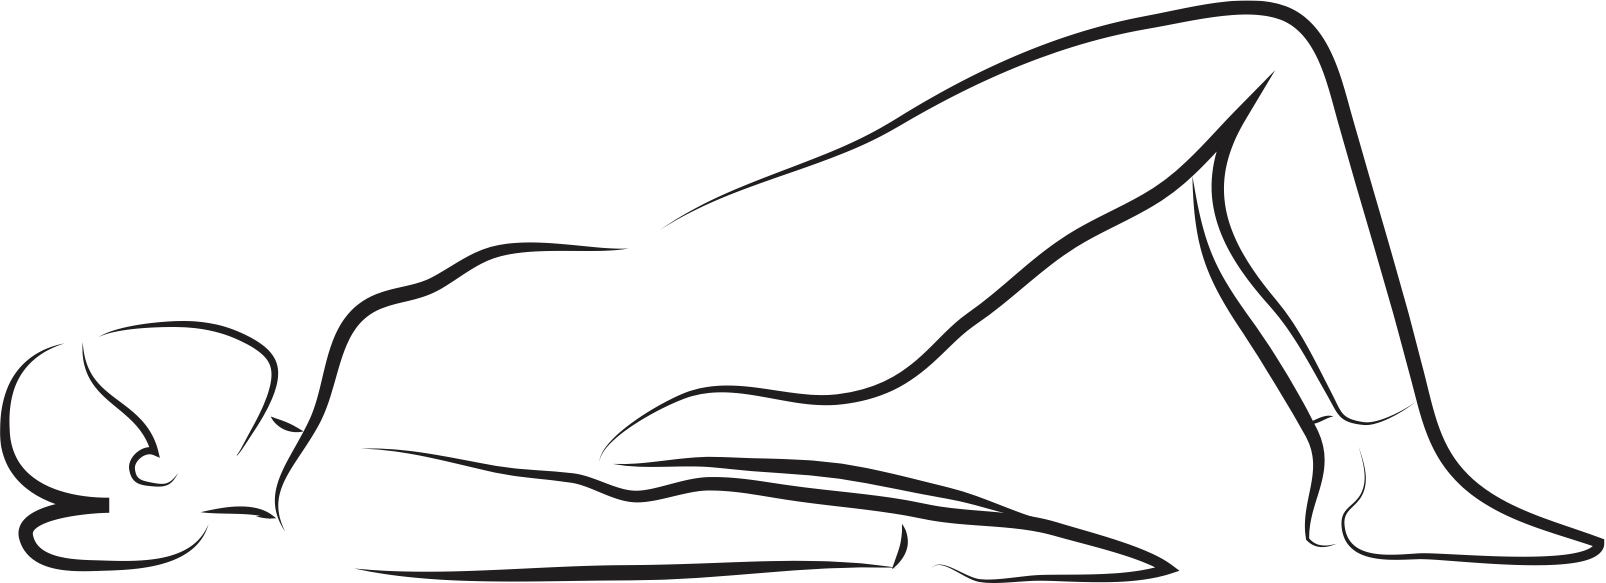
Hold at the top for an inhale, try to soften through the pelvic floor.
On your exhale, FIRST, lift up through the pelvic floor, try to close the hip bones towards each other, then come down the upper back, middle back, lower back, hips.
Please resist rolling down—catch yourself if you do and keep your spine in neutral as you go up and down. Inhale again at the bottom.
Do this from start to finish for a few rounds, a few times a week. Remember to initiate the movement first on exhale with the pelvic floor and your lower abdominals, then move your body up off the floor.
Taking This Pelvic Floor Work Into Daily Life
You can add this breathing style and pelvic floor initiation prior to moving throughout the day. For me, the first several yoga classes, working out at the gym, and rollerblading with my daughter in a stroller were very challenging/interesting with this style of movement initiation.
Go easy on yourself. Recognize this as a journey with no judgment on yourself or others. It took a lot of time, dedication and patience, but once my pelvic floor started functioning correctly, my neck healed on another level. My deep neck stabilizer muscles finally turned back on—something they have not been able to do in over ten years since my initial spine injury. This was very significant. It was a missing piece I had been working toward for the greater part of the last decade.
My neck and body no longer feel as vulnerable and I am enjoying this newfound freedom of movement, strength, and stability.
Start where you are with what you can grasp, and keep learning and exploring. The more you practice and connect with your pelvic floor, the more your body will start to do it naturally.
I hope you enjoy adding these new ways to create stability, strength, and release in your life as these components are critical to a healthy and happy body.
Shop this post: For pelvic floor massage, get Original Yoga Tune UP Therapy Ball Pair (used in the pelvic floor massage technique), or the Coregeous® ball (seen in the feature image and as a substitute for the Original Therapy Balls).
Related Article: Building Body Confidence Through Pregnancy with Self-Massage
Learn more about our Therapy Ball Products and Programs
Interested in video and blog content targeted to your interests

I have several friends struggling with pelvic floor issues. Thank you for the tools and guidance provided in this article. I already own the yoga tune up therapy balls and the coregeous ball and plan to practice what you have shared and then share it with my friends. I attended a pelvic floor workshop a few years ago and that was the first time anyone ever shared that our pelvic floor may be too tight and that is why we are having issues – so I appreciate you bringing that to light again in your article.
I have many female friends who, after childbirth or as they age, have issues with bladder leakage when jump roping, box jumping, laughing or coughing. I have never had a doctor talk to me about pelvic floor musculature and how to keep it strong (other than kegels) and healthy. This article provides compassionate, clear, and simple guidance on ways to care for your pelvic floor through self massage and strengthening. I plan to share this information with friends. Thank you!
I am encouraged to see more and more people considering pelvic floor health. I had been having minor issues and when I talked to my doctor I was told do 100 kegels a day. What?! If my pelvic floor is already tight, how is that going to help? Over the years I have found numerous, helpful exercises in my research and this is definitely one of them. I was amazed the first time I sat on a Corgeous ball and practiced pelvic tilts. I am still working on this area but I love having all these tools to help me.
As someone navigating hypertonicity of the pelvic floor, this post really resonated with me. I appreciated the emphasis on how “tight doesn’t mean strong”, that distinction is so often overlooked. The combination of breathwork, gentle massage with therapy balls, and mindful movement gives me hope that I can retrain my pelvic floor to relax and release, rather than constantly brace. My key take aways are to start incorporating the Coregeous Ball and Roll Model techniques into my evening routine, and I look forwrard to the subtle shifts in how my body feels. Thank you for highlighting the importance of self-awareness and giving us tools to take healing into our own hands!
A very insightful read. The pelvic floor has long been an overlooked area in the fitness world, but I’ve noticed more professionals starting to bring attention to it. I’m looking forward to trying the exercises in this article to see how they might improve my functional health moving forward.
Hi! After taking the Body by Breath course I started pointing out the pelvic floor more to my students. Many students came up to me after class, almost ashamed, telling me that they did not feel the pelvic floor. I am using your soft approach with the gorgeous ball, where touch ignites awareness. Students are so thankful about this. Thank you for this article!
It’s taken me about 6 months to finally feel/understand these muscles! I’m still having trouble softening but working on it, thanks for sharing this!!
Stephanie hi. I am a pelvic floor therapist. I loved this article. You are so right about the majority of my profession being very uncomfortable addressing the pelvic floor. I found a lot of doctors I marketed too did the same thing. I loved the releases, breath work and exercises. I really liked your emphasis on maintaining spinal alignment during the bridge. I’m so glad you have shared your experience. I know most people wouldn’t put cervical pain and pelvic floor dysfunction together but it makes perfect sense. Thank you again for this wonderful article.
I’ve noticed that almost every time I teach breathing techniques like this to practice turning the pelvic floor “on” or “off” students will come up to me after class and tell me about something elsewhere in their body that has released or lit up for the first time (or the first time in a long time)– it’s amazing how engaging with the pelvic floor & breath can affect so many other parts of the body. I wish more people felt comfortable working with their pelvic floors because it makes such a huge difference!
Thanks for this great article and it’s a practical start with the sample movements provided. I loved the connection to the breath as a component of getting familiar with this area of the body. I also appreciated that men were included in how to work with their pelvic floors – something that is not often offered in the medical world.
I love how the article breaks down the importance of not just strengthening but also learning to relax those muscles. For me it was always so difficult! Using therapy balls and incorporating breathwork are such a great tool, to make it easier. And by the way, who knew that focusing on the pelvic floor could lead to such significant improvements in areas like neck stability?
To be honest I don’t give much attention to the pelvic floor when I teach because of being very trauma informed about different peoples experiences. I have gone through periods in my own personal life where I have given more attention to the muscles of the pelvic floor since I know that is a place of weakness in my body. I can’t say I enjoyed the palpating but it does allow for more muscle engagement when doing exercises like kegles.
I think it is interesting how the pelvic floor may be related to other aspects of seemingly unrelated pain, like in this case neck pain. It caused me to contemplate how this could be and the obvious answer is fascia. But, I also started thinking about how pelvic dysfunction could alter gait, lead to muscle imbalances, and ultimately maybe even injuries. Lastly, I enjoyed thinking about how breathing and movement could be partnered with self massage to work toward healing the pelvic floor.
This is a great article. I appreciate that it discusses the silence regarding this part of the body as well as possible sensitivity. I saw a pelvic floor pt about 5 years ago and though they complimented my ability to take deep abdominal breaths the focus on relaxing and engaging the different muscles of the pelvis floor were incredibly beneficial. I’m excited to get back into incorporating some of these techniques as outlined in the article!
The pelvic floor releasing on inhale reminds me of the umbrella analogy used with the movement of the diaphragm–I wonder if I got that right. Also, the bridge pose to strengthen and tone the pelvic floor reminds me of pilates!
In my mind, I hadn’t paused for long enough to connect pelvic floor work / focused attention to issues as far upstream as cervical spine (etc)… My friend who is a pelvic floor therapist has talked about prolapsed bladder, for instance, but this article has ignited my curiosity. Will attempt the above exercises. Thank you!
Thank you. This is extremely helpful. After suffering uterine prolapse, my awareness of pelvic floor disfunction became urgent. I was paranoid something else would eventually prolapse and so many doctor’s acted like I was just being foolish. I set out to learn more about pelvic floor health and exercises that help stabilize everything and it has been a tremendous help. Sad that we must, so often, find our own solutions to medical issues that are rather simple and non-invasive to fix or at least help maintain.
Pelvic floor
This was fascinating. I recall doing a version of this in one of Jill’s union fit classes within the past year and learning more about it here is excellent. I have only started to explore the importance of the pelvic floor within the past three or so years, so anything I find where I can apply to my movement practices and share with others is wonderful. I thought the explanations and exercises in this article were extremely accessible and I was grateful to better understand some of the dynamics at play. I’ll definitely bookmark this one– bridge with emphasis on pelvic floor with breath is something I’ll be checking out! Thank you for this wisdom.
Après 3 enfants, j’ai toujours su que la santé du plancher pelvien était important mais je ne savais pas à l’époque que d’autres structures de notre corps pouvaient être mises à mal s’il était défaillant.
Très intéressant, il est vrai que notre plancher pelvien est méconnue. Dans tous les cas il est essentiel de faire sa connaissance et de rendre notre plancher pelvien compétent pour une meilleure santé.
travailler sur le plancher pelvien n’est pas facile mais apporte beaucoup de bienfaits surtout que je suis en posture assise toute la journée. Merci pour les excercices
I am a pelvic floor physical therapy and often see stories like that! All professionnal should screen for pelvic floor symptoms
Very interesting and useful article. Understanding and being able to manage your pelvic floor is an essential asset for good health. Thank you.
I really appreciate Stephanie’s thoughtful writing of this blog. There is definitely an interesting lack of discussion about the importance of the pelvic floor, although this is seeming to change (yay!). As a mother of 2 I have experienced the need for a focus on getting to know my pelvic floor and the tight doesn’t equal strong equation. As a yoga teacher, I’m learning to accessibly integrate these practices into all levels classes for core and overall stability and strength.
I appreciate this article so much and love how simply it is explained. Just trying the breathwork connected with the lifting and lowering, its amazing to me how foreign this is to my body. There is definitely a disconnect for me in this area and I’m looking forward to putting theses techniques to use.
This article is so important and hit the nail on the head. As a former athlete the pelvic floor was never discussed. Even in a lot
of my movement trainings (YTU aside) the pelvic floor was non existent. It’s so important to treat the body as a WHOLE and that includes the pelvic floor! Loved the mention that tight in the pelvic floor doesn’t equal strong. Such a great read!
I appreciate the gentle tone of this article. acknowledging that it can take a long time of consistent practice to strengthen the pelvic floor. I will try these practices and note if there are other improvements with my postural challenges.
This article was so helpful. I agree that so many of us (myself included) are so disconnected to our pelvic floor muscles. Releasing I find is the hardest part to train but using the breath and visualization can build on our mental map. Having the coregeous ball is a great tool for proprioceptive feedback.
What a wonderful source of information/gentle exercises for understanding the pelvic floor for each individual. I’ve always been told to focus on the strength of my pelvic floor, but rarely for the release. And like you say, having control is being able to activate or relax the muscles of the pelvic floor. such simple yet potent information. Thank you!
Thanks for detailed yet easy to follow instructions for therapy ball and the supine exercise routines. Due to its location, pelvic floor is often a blind spot for many people. We need more articles like this to bring more attention toward this important part of human body.
This looks like a fantastic practice in a body area often overlooked. I wonder if these exercises apply for treating incontinence as well as post partum issues? seems like they would…
Thank you for outlining this gentle way to become more aware of the pelvic floor and the tips for an optimal functioning pelvic floor. I love this therapy ball exercise and the feedback the ball offers especially after you come off of the ball. And I really appreciate the cue to keep your spine in neutral in the bridge lift as well. It’s so easy to go on auto pilot and begin to roll down. I’m looking forward to putting this practice into my “movement diet”. This info is so valuable to realize that being able to relax your pelvic floor is just as important as knowing how to contract and lift too.
I have always been so focused on strengthening my pelvic floor that I have never considered releasing it. Truthfully, that thought feels scary because it is such a loaded area for me. Thank you so much for sharing this information! Now time for som self exploration and release!
I love the application of Yoga Tune Up balls to help with tight Pelvic Floor release. I am trained in pelvic floor yoga and have been considering ways to help men who can’t perform internal massage. I can’t wait to try this out on a few clients who, I believe, have a tight pelvic floor that is the cause of low urine flow.
Many women are also not able to reach “down there” to effectively massage the internal muscles and help to release things.
Thank you for the inspiration and guidance.
That therapy ball release is so intense, wow! This is such important work, and I appreciate the sensitivity to the emotional and trauma response aspects that can come up. It’s such a shame that this area is so taboo that disconnection and even avoidance is more often the norm and not the exception. Thank you for sharing!
Taking a lot away from this post. Looking forward to including this in my personal practice and offering it to many other women I know who would benefit from it.
Merci pour les exercices, ça fait quelque temps que je pense à travailler cet région mais je ne savais pas comment faire.
So thrut. I wish a had kown that before
WoW ! That was so helpful , have been in pelvic rehab for years and couldn’t find anything to release the tensions. Thanks you
https://www.amazon.com/Breathing-Book-Vitality-Through-Essential/dp/0805042970
I wanted to share this link to The Breathing Book by Donna Farhi. It has helpful information and exercises aimed at gaining awareness of the pelvic floor and recognizing the subtle movements of the pelvic diaphragm. Hope this is helpful to you, and your readers.
Stephanie,
Thank you for this post. I’m a man who has stuggled with PFTension for most of my adult life. Bladder leakage, sexual dysfunction, and disconnection from this region of the body. After only one afternoon of practice, your exercises helped me to connect and gain an awareness of that area that i have never experienced before. I look forward to slowly incorporating these exercises into my routine and experiencing a new and stronger more flexible way of engaging with the world. If that sounds like too much, well so be it! I’m excited! Any future posts on this topic, or tips specifically for men would be much appreciated. I am researching pelvic floor therapists in my area (chicago). Do you suggest visiting a pelvic floor therapist for the above listed issues?
So glad I happened upon your article. Keep spreading the word, let’s all take care of our pelvic floors.
Thank you,
Elliot
Really interesting! We are not talking enough about this subject. I like the way the balls get me more aware of my pelvic area and I can release some tensions. I will try your strengthening exercises!
Un grand oublié retrouvé une place de choix dans cet article: le plancher pelvien peut être libéré et relaxé par des massages avec les balles et ballon Tune up, par la respiration et par le mouvement. J’ai fait les exercices et c’est efficace…Merci,
Hi!
It’s really special to discover how the pelvic floor can have a big impact on our posture. I’m feel very greatful to know this information today to be responsable on my pelvic floor healt.
Thank for this article.
Just going thru this, having some urinary problems that the urologist thinks is due to pelvic floor dysfunction. Any one else have these issues?
Do you have any classes or webinars on this material? Would be interested in attending or purchasing. Thank you
Thank you for sharing these techniques to gain awareness of the pelvic floor, but also to learn to RELEASE it. I also learnt about this part of my body after pregnancy, and I am still learning to release it (I heard about the importance to release it even some months later after becoming aware of the pelvic floor). It takes a lot of perseverence, but it improves 🙂
Merci, très intéressant. D’abord de bien connaitre sa position dans le corps et son important impact sur notre santé.
De plus, la facilité avec laquelle les balles thérapeutiques peuvent nous aider à le libérer et le renforcer. Hâte d’essayer.
After reading this post, I ordered the tune-up yoga balls and they arrived today! Is there any video showing the exercise you’re describing that can be accessed? Or perhaps a programme I could subscribe to? I suffer from pelvic floor dyssynergia and have been misdiagnosed for many years and no medicine helps me (obviously!). Thanks a lot for any tips!
I teach Pre and Postnatal Yoga and the pelvic floor interests me a lot. It is a region of the body that is unknown to many people. I try to always teach my students a little more about it.
I cannot wait to try these exercices !
Once we gave birth, we are so busy taking care of our children than we forgot that we are the origin of these lives.
Interested in pelvic floor relaxation
Thank you for the thoughtful article and bringing attention to this piece that is missing for so many people! “As above, so below” my body worker friend always says what happens at the top of the spine will be mirrored at the bottom. I never thought about how to link this in teaching movement practices to students, but now I totally see it! Thank you so much for the thoughtful and detailed excercises, breath work, and tips, and for being willing to share your personal experience with this.
What an interesting and informative article! Thank you!
Thanks for bringing to light the pelvic floor! That is definitely my blind spot after three natural child births, and I’ve ignored it both voluntary and involuntary for my whole life! Looking forward to my first step:mapping with the YTU balls! Thank you for this wonderful article.
Unfortunately this subject has been a taboo where I come from. But it is becoming something that people are talking about and not just women. I have had so many male clients that have reached out for advise. Very good blog where you can find all the healing tools necessary, a lot of the time I see people just do one of the above. This combination is perfect for everyone to feel empowered.
The breathing brings the proprioception to a maximum.
Very accessible article for an area of the body that is so important but often ignored. I appreciated the referencing to the male pelvic floor since too often it is thought of as a “female issue”.
I am going to read this post over and over ! There’s so much info packed in here I feel overwhelmed ! I can’t wait to try some of these exercises . There’s a definite correlation between stress and me tightening my pelvic floor. These exercises look so relieving !
Great blog for a subject not shared often enough. Thank you for your courage to share and speak on a quiet conversational topic
This is such an important topic. I teach mostly women over 50, and almost all of them desperately need to awaken awareness and mobility in the pelvic floor.
Thanks for the great discussion about pelvic floor. I love the connection of pelvic diaphragm to breath. We forget how important our pelvic floor health is to us as women. Ready to explore more.
This is such a huge topic and of great significance. I appreciate the careful approach to people that this is a journey and will look different for each individual it so worth stepping into
Interesting to learn the yoga tuneup balls can be used on virginal area.
So hopeful to find this article. Thank you and great detailed information
Thanks for writing on this subject, I would love to see more information regarding pelvic floor and normalizing that it is an area we need to address.
The pelvic floor is such an interesting topic which I would like to expand my knowledge in. Including male and female with breath to movement gives this practice a way I can empower myself and help my students find empowerment.
I very much appreciate the exercises you’ve outlined here & can’t wait to bust out my YTU ball to try the first one! I think that I had too many years as a yoga practitioner where Mula & Uddiyana Bandha (and as a woman, kegels) were glorified as things that would give us super powers. It wasn’t until I started taking vocal lessons that my teacher called me out on the fact that I was really only breathing into my chest. I was chronically engaging these bandhas in regular day to day stuff! It has been an interesting journey to consciously break those patterns. Thank you for these additional tools.
This is a very interesting article, it´s true that we don´t talk a lot about our pelvic floor, but after 3 pregnancies now I understand that we cannot underestimate our pelvic floor. I think that for a good health in general we need to have both, strong abdominals and strong pelvic floor. Thanks for sharing this amazing info.
It’s amazing that just yesterday I was having a pelvic floor conversation with my students and now I’m reading this (& already shared it with them!) and my really glad more and more people are talking about this “taboo” area of the body. Many people thinks that kegels are the solution to all pelvis floor related issues, but the truth is, there’s so much more to it. And as you say, we are really disconnected from this area and approaching it takes time, softness, patience and a gentle disposition to discovering new sensations and feeling our body in a whole new way. Thanks for sharing this practice, I’ll make it a daily habit for sure! And I was wondering, do you know the correlation between the pelvic floor and the spine? (You mentioned it related to your chronic neck pain). Because I have heard about it, but I’m not sure what’s the link. Thanks again!
A journey into pelvic floor!! what i love about your article is that you also talk about male pelvic floor, almost all the articles and persons i have heard talking about pelvic floor dysfunction only address female pelvic floor, but men also will benefit enormously with this exercises like the firefighter you mentioned. I have been in this pelvic floor journey and found out my breath was not coordinated with my pelvic floor movement, i was squeezing the pelvic floor muscles while i was inhaling and it was very tight, when i found out more about this magic spot and how it affects everything above i started to pay more attention to it!.
Thanks!!
Thanks for the great article! To be honest, I’ve never thought too much about my pelvic floor health and truly assessing how it is doing. It’s such a rarely talked about thing in most contexts of my daily life and surprisingly not talked about much in my movement practice. I’m curious to see how these self-care techniques will go and what I discover. Thanks!
Pelvic health and discovering how to share the techniques fo r health is of great to me. Thank you for this super helpful article
I found this so interesting, Stephanie. I read your blog post because my sister had pelvic floor surgery. I wonder if her back pain could be helped by addressing the pelvic floor. I’ve never addressed mine either so I’m looking forward to trying out these exercises and sharing them with my sister. Thanks!
In my late teens, I would experience so much pain in my abdominal area and I was told by a physycal therapist that my my pelvic floor was too tight. As I’m r egnant now, this is a big concern of mine and I will add this these exercises to my personal practise. Thank you!
Such an important topic that is so often overlooked or not addressed, especially for men! Thanks for such a clear presentation of process and placement.
Someone pointed me in the direction of your blog post today and I was intrigued! It’s true, pelvic floor health is often overlooked. I was just trying the bridge you described. I think I will need to repeat this several times before really getting it. Thanks for the info 🙂
Wow! What a big compliment – thank you! I do hope that pelvic floor PT becomes standard care. Yes, all women whether or not they have birthed a child – men, too should all be aware of the health of their pelvic floor. I’m so glad you get the importance of it.
I look forward to trying this on my own, thank you Stephanie!
Thanks to contributing solid information to my newest fascination: pelvic floor health. What is unseen can also easily become a blind spot for many of us.
I really appreciate this article because of the awareness it brings to the community. This is something that I’ve only begun to learn about in the last few years, but the pelvic floor is so important to learn more about. More and more of my clients are asking about help with the pelvic floor. Of course, I am no expert, but I am exploring local Pelvic Floor PTs and other specialist whom I can partner with or at least refer folks to. The first time I ever heard about pelvic floor dysfunction was in the YTU ball rolling trainings. I am glad that it is getting more attention as it affects more people than we think. Although I don’t currently have any pelvic floor dysfunction that I know of, I am curious to try out these techniques for awareness purposes first.
I am so happy to hear Melanie! You are not alone, it is very common and I am thrilled to hear you are on a path to healing. Keep me posted how it goes – the work I refer to is so potent for getting the body back into a functional place. Should you desire more support, please know there are very talented professionals out there. I couldn’t recommend working with a pelvic floor Physical Therapist enough.
Thank you for sharing – You’ve explained this in a very thorough and understandable way. I am attending the Tune up ball training in September and am very excited to bring this information to my Yoga classes!
Thank you for the beautiful, thorough explanation. This is an area that most of us need to get to know better but it’s scary and hard to find good instruction on how to approach it. Love the gentle introduction.
I love the diagrams here! Thanks for sharing!
This is the best article for postpartum until pelvic floor PT becomes standard care (hopefully one day). Pelvic floor issues are a blind spot for many women whether or not they have birthed a child. Thank you for providing clear education on this often misunderstood area of the body.
I have just started exploring the possibility of pelvic floor dysfunction in my own body, so I appreciate the detailed explanation of several methods to release and strengthen the pelvic floor. I plan to try these soon. Thanks for sharing…